How To Screenshot In An HP Laptop Or Desktop
Question

Taking a screenshot is a simple yet unique operation that allows you to capture exactly what appears on your screen. Here’s how screenshot in an HP laptop or desktop computer.
How To Take That Screenshot On Your HP Laptop Or Desktop
There are different ways to take a screenshot on an HP laptop. Your laptop model may be different, but the following methods will work for each.
Here are two (2) of the most suitable ways:
*1* Using Shortcut →  + Prt Src
1. Press the Windows key and the Print Screen key (Prt Sc) at the same time. You will see the screen flicker for a second, which means that it has successfully taken a screenshot.
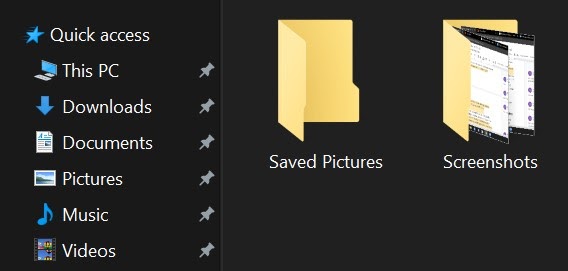
2. Go to This PC > Images.
3. All the screenshots will be saved in the Screenshots folder like this ↓
*2* Use the Snipping Tool
The Snipping tool is a great built-in feature that lets you choose which part of the screen you want to capture. Regardless of your operating system, this tool works great for all Windows models.
Go to the Start menu and type ‘Snipping Tool’ in the search bar. Once the application opens, you’ll see many options at your disposal.
How to take an HP screenshot using the Snipping Tool.

Click on “New” or “Ctrl + N”. You can choose the desired shape of the screenshot from among the modes offered by the Snipping Tool. A rectangular snapshot is standard. In addition, there are three other ways to capture the screen:
* Free-form Snip allows you to capture any screen shape, be it egg-shaped, round, or arbitrary.
* Window Snip allows you to capture your active window with a simple click.
* Full-screen Snip allows you to capture the entire screen with a single click. This is especially useful for users with two monitors. This option allows you to capture both screens at the same time.
Once you have taken a screenshot, you can save it to the desired location by pressing Ctrl + S.
Credit:
https://markuphero.com/blog/articles/how-to-take-a-screenshot-on-an-hp-laptop/
Leave an answer
You must login or register to add a new answer.